Archive

Archive for the ‘Programming Help’ Category

Forcing ssl to particular page and non-ssl to other pages

March 14th, 2013 2 comments

In projects we may need to make sure some of the urls are only accessible from ssl (https). It’s really useful for user sections. And rest of the url should browse from non-ssl (http) link. It can be done with a small htaccess rules.

Here is htaccess hack to do:

#SSL for some pages
RewriteCond %{HTTPS} off
RewriteCond %{REQUEST_FILENAME} !index\.php$ [NC]
RewriteCond %{REQUEST_URI} ^/(signin|signup|account) [NC]
RewriteRule ^(.*)$ https://%{HTTP_HOST}%{REQUEST_URI} [R=301,L]

In this block we are checking for ssl off and some url, if match we redirect the user to same url in ssl version.


#SSL off for some pages
RewriteCond %{HTTPS} on
RewriteCond %{REQUEST_FILENAME} !index\.php$ [NC]
RewriteCond %{REQUEST_URI} !^/(signin|signup|account) [NC]
RewriteCond %{REQUEST_URI} !^/(api) [NC] #allow this url from both ssl and non-ssl
RewriteRule ^(.*)$ http://%{HTTP_HOST}%{REQUEST_URI} [R=301,L]

In this block we are checking for ssl on and some url, if match we redirect the user to same url in non-ssl version. Here u may notice we are using a extra check ( RewriteCond %{REQUEST_URI} !^/(api) [NC] ) , it’s because in project we may need some url those accisable from both ssl and non-ssl.

Website Optimization 01: disable ETag in apache (debian/ubuntu)

October 20th, 2008 10 comments

From last few months i am working to optimize our somewhereinblog.net server, because right now we are getting huge amount of hits everyday (1,00,000 + hits). In this series i will describe the tricks that i learned 🙂


On my first post of this searies i will talk about ETag. Before disable this, first we need to know what is ETags. From wikipedia:

An ETag (entity tag) is an HTTP response header returned by an HTTP/1.1 compliant web server used to determine change in content at a given URL. When a new HTTP response contains the same ETag as an older HTTP response, the contents are determined to be the same without further downloading. The header is useful for intermediary devices that perform caching, as well as for client web browsers that cache results. One method of generating the ETag is based on the last modified time of the file and the size of the file.

In certain situations, ETags may not improve the performance of a web application. For instance, some ETag generation schemes incorporate the file’s inode on the system. The file’s inode is unique to the file only on one specific machine. If a site has multiple servers, each with its own copy of the file (i.e. load balancing), then a user’s request for the same file may get served by a different machine. In that case, the inode will almost certainly be different and, if it is used to generate the ETag, it will cause the file to be re-downloaded.

So, this is not always helpfull for all type of sites. Always remember, if you are not using anything, you should not enable or kept enable on server.

Apache by default enable this ETags. We need to disable this to get better performance. Here i am describing the steps for debian and ubuntu linux.

We will take help from mod_header to disable ETags, so first we need to enable the mod_header (apache module)

sudo a2enmod header

sudo /etc/init.d/apache2 restart

this command will enable mod_header. Now open /etc/apache2/apache2.conf with your faviourate browser.

sudo nano /etc/apache2/apache2.conf

then paste the under given code to this apache2.conf file

Header unset ETag
FileETag None

now restart the apache2, and check if it working or not. If every thing OK, then you will not see the etags anymore 🙂

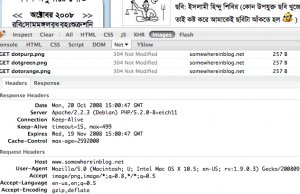
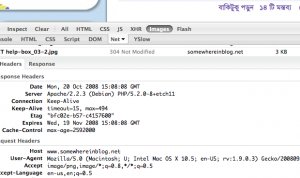
For better understanding i am giving you 2 screenshots.

Before ETag disable


After ETag disable:


If you don’t have root access to server, you still can do this from .htaccess , just copy that code to .htaccess instate of apache conf file.

Ask me if you have any question or problem about ETag.

phpmailer for codeigniter (ci)

May 19th, 2008 15 comments

on our new server we was getting problem with mail sending. yahoo and some other mail server was not receiving our mails to there inbox. so i imported the most popular php class (phpmailer ) in codeigniter as plugin. it’s install and use is too simple. you have to download the zip file from here, then unzip it to your plugin (systemplugins) folder. then edit phpmailer_pi.php , and edit the default configuration as needed as your mail server (default configuration will work fine with gmail smtp, you only have to edit the user name and pass) .

download:

phpmailer for codeigniter

usage:

you can now use all the functions that phpmailer supported. here is a the example that you will get in phpmailer site, but in ci format.

 < ?php
/*
 * Created on May 19, 2008
 *
 * To change the template for this generated file go to
 * Window - Preferences - PHPeclipse - PHP - Code Templates
 */

 class Action extends Controller {

	function Action()
	{
		parent::Controller();
	}

   function testMailer()
   {
	   error_reporting(E_ERROR);

	   $this->load->plugin('phpmailer');
	   $mail=new PHPMailer();

	/*$mail->IsSMTP();
	$mail->SMTPAuth   = true;                  // enable SMTP authentication
	$mail->SMTPSecure = "ssl";                 // sets the prefix to the servier
	$mail->Host       = "smtp.gmail.com";      // sets GMAIL as the SMTP server
	$mail->Port       = 465;                   // set the SMTP port 

	$mail->Username   = "[email protected]";  // GMAIL username
	$mail->Password   = "xxxxxx";            // GMAIL password
	*/

	$mail->From       = "[email protected]";
	$mail->FromName   = "sender name";
	$mail->Subject    = "This is the subject";
	$mail->Body       = "Hi,This is the HTML BODY";                      //HTML Body
	$mail->AltBody    = "This is the body when user views in plain text format"; //Text Body
	//print_r($mail);
	$mail->WordWrap   = 50; // set word wrap

	$mail->AddAddress("[email protected]");
	$mail->AddReplyTo("[email protected]","sender name");
	$mail->AddAttachment("/path/to/file.zip");             // attachment
	$mail->AddAttachment("/path/to/image.jpg", "new.jpg"); // attachment

	$mail->IsHTML(true); // send as HTML

	if(!$mail->Send()) {
	  echo "Mailer Error: " . $mail->ErrorInfo;
	} else {
	  echo "Message has been sent";
	}

   }
}

?>

how to move your php development environment to linux (Debian/Ubuntu)

August 4th, 2007 26 comments

Nowadays, lots of php developers are thinking to move their development environment to linux. And I am writing this tutorial for them. As I like Debian GNU/Linux (www.debian.org) best and ubuntu (www.ubutnulinux.org) is now doing great, in this tutorial I am using the commands for debian & ubuntu.

Ok, now starting:

First on all let’s make a list of software a PHP developer need mostly:

1.Apache
2.PHP
3.Mysql
4.PHP IDE

Ok, let’s start with Apache. Debian & ubuntu use APT to manage the packages. You can easily install apache using apt, here is the command

Debian user:

su

Ubuntu user:

sudo su

Rest of the command ar same for both debian & ubuntu.

apt-get install apache2

It will install all the apache2 & all the related packages (software)
If you need to enable mod_rewrite, follow this link
Now install the PHP

Apt-get install php5 libapache2-mod-php5

This will install the php5 and configure your apache2 server for PHP. You don’t need to do anything.
Lets test the server, if it working ok.

touch /var/www/info.php

Chown www-data:www-data info.php

Now edit this info.php with your feviourate editor and add write code to show phpinfo():
and now browse http://localhost/info.php from your browser. Now check if all your requested library are installed.
if you need any more library, you can check if it already available on your debian/ubuntu package list.

apt-cache search php5-

then you will get the list of available php5 library. Now simple use this command to install it.

apt-get install php5-gd

(example, if you want to install php5 GD library)

Remember: after installing every extra packages, you must need to restart apache server

/etc/init.d/apache2 restart

Ok, so you have now apache2 and php5 installed system. Let’s install mysql:

apt-get install mysql-server-5.0 php5-mysql

It will install all the necessary packages to run mysql-server.
Now restart your apache to take effect.
Complete!!!! Server is allmost ready.
Now i am going to derive how you will transfer your old code to this new environment. Belive me it’s too simple, so don’t worry.

First of all copy your source code to /var/www, here is the details procedure:

mkdir /windows

Here we make a folder for C drive of windows to mount.
mount /dev/hda1 /windows
then we mount the C drive to windows folder (here i use hda1 as example, if your hdd is sata then it will be sda1)

cp -r windows/Apache2/htdocs/xyz /var/www

here we copied our xyz site to /var/www (in debian and ubuntu, default apache2 root folder is /var/www)

cd /var/www

chown -R www-data:www-data xyz

Now change the ownership to www-data

Now we need to move the mysql database, there is two way:

1.use phpmyadmin
2.simple copy the database from data folder
I am deriving the 2nd way.

cp -r /windows/Mysql/data/xyz /var/lib/mysql

chown -R mysql:mysql /var/lib/mysql/xyz

You are done.

PHP Ide for linux environment:

    1.Zend ( i personaly use this)
    2.PHPEd
    3.PHPEclipse
    4.quanta plus
    5.emacs
    6.vi
    7.PHPedit

***I know this tutorial needs more edit, please make your comments if you got anything wrong, or missed anything. I want it a cool tutorial for php developers.

Read some reviewed, the best and most affordable php hosting solutions on the market.
how to enable mod_rewrite in apache2.2 (debian/ubuntu)

July 15th, 2007 323 comments

Here i am going to describe how to enable mod_rewrite in apache2.2 -specaily for debian.

In default installion of apache2.2 on debian never enable mod_rewrite default. So you may need to enable .

First install the apache2.2 with this command :
debian user please use “su” before start this process
ubuntu user please use “sudo su” before start this process

apt-get install apache2 (it will install apache 2.2)

on current debian system you can enable mod_rewrite with simple command

a2enmod rewrite

old style, you can skip this portion

now use locate to find if the mod_rewrite.so is availble on your server

updatedb
locate mod_rewrite.so

it will found in “/usr/lib/apache2/modules”

new apache follow some folders to enable and disable mods.
so now do this:

cd /etc/apache2/mods-enabled
touch rewrite.load
gedit rewrite.load (you may use any editor to edit this file)

now paste this following line

LoadModule rewrite_module /usr/lib/apache2/modules/mod_rewrite.so

end of old style

Then edit /etc/apache2/sites-available/default or /etc/apache2/sites-available/000-default (check which one available on your system)

Find the following

Options Indexes FollowSymLinks MultiViews
AllowOverride None
Order allow,deny
allow from all

and change it to

Options Indexes FollowSymLinks MultiViews
AllowOverride all
Order allow,deny
allow from all

and finally restart Apache

/etc/init.d/apache2 restart
or
service apache2 restart

OK, you done 😀

don’t forget to comment, if it works or not.

thanks.

if you like my post, please tweet it, so other also can see this post.

subversion installation (1.4.3)

February 7th, 2007 2 comments

A great post about subversion of hasin brother.

On the new version of subversion 1.4.3 u will need to do some thing more. svn-1.4.3 cann’t be install as service. U have take help from 3rd party tools.

Two of them are:

  • SVNService is a free tool written by Magnus Norddahl (not found)
  • SrvAny is avaliable free of charge from Microsoft

or u can use “sc” command to add subversion as service..

Here is the example:
sc create svnserve binpath= "c:svnservesvnserve.exe --service --root
c:repos" displayname= "Subversion" depend= tcpip start= auto
These command must be entered as a single line.

Here bindpath is the where the svnserve.exe is installed, –root is the root directory of
repository, displayname is the name that will display on the windows service list, start = auto is used to start this service on system startup.

Hope it will help you 🙂

69 queries in 0.105 seconds